The Rudder Is Painted

The Rudder Is Painted

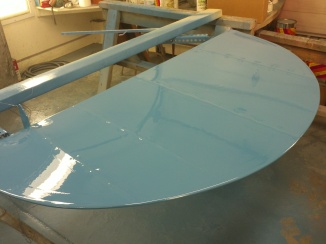
The rudder has been sprayed blue to match the fuselage. We had to put two coats of white over the silver coat to act as a primer, then three more coats of blue. On the last coat we put the paint in the freezer, along with some reducer the paint dries much slower resulting in a much better finish. This paint flows out after it is sprayed on, too thick of paint and you get runs, too thin and the surface is rough, it has to be just right to get a great finish. The picture shows it glossy because it was just sprayed. We have to let the rudder sit for at least two weeks to degas, or the fumes to all escape the envelope, before we can start painting the tail numbers on it. After that we will rub it out with a rubbing compound, a coat of wax and it will be ready to hit the skies!

Cables and Cable swivels

Cables and Cable swivels

We also had to clean up some cable swivels. I didn’t get pics but we had to cut and crimp new cables for the entire aircraft and we cleaned up these swivels before reinstalling them. Pretty simple really, just hit them with a wire brush and scotch bright and then spray them with a clear coat so you don’t lose the shine.

Cutting the cables was an interesting project. We had to measure the new one out to get close to the same size and then use the cable crimper to fasten the cable ends together, without forgetting to put the swivel ends on. Originally these would have been braided but we opted for a wrap that covers the crimp. Put some Birds Eye Shellac and there ready to go in the plane.

Most important thing I learned here is that cables fray easy and they are sharp!

Drain Grommets Installed

Drain Grommets Installed

The drain grommet is used to drain water from covered surfaces. With the wings and tail feathers covered water can get trapped inside these surfaces and encourage corrosion of the frame and other important parts.

These are installed by putting some polytac down on the fabric on the bottom surface or lowest part of the covered surface. we then put a plastic grommet into the polytac and then cover the washer with a dollar patch. Dollar patches can be purchased but we made our by hand using some old fabric covered in polybrush and cut out with a special scissors.

During the covering process we didn’t install the drain grommets so we had to go back and put them in after the first coat of silver. Great now we can get to putting the color on!

Spraying Silver

Spraying silver

This is the door and rudder on a jig to be sanded and painted. Here we have the silver, one of many coats on. We put silver on the fabric to protect it from harmful UV rays that deteriorate the fabric. We also use it as a filler to cover all the edges of fabric tape. This is all part of the PolyFiber process for covering an airplane with fabric.

The Back Story

Since I haven’t been there since day one, a quick summary of what has already taken place.

In November 2011 EAA chapter 211 decided to start a project for members to work on and learn some of the skills of aircraft building and restoring. They found and American Eaglet in Iowa. After moving it to Michigan they began to tear it down to see what all needed work. I found the project in late 2012. I started attending the work sessions just before the holidays. To find more info on the Eaglet check out the chapter page!

http://www.211.eaachapter.org/americaneagletrestoration.htm

Intro

This is blog is going to be a collection of experiences and things I have learned while working on the restoration of a 1935 American Eaglet.